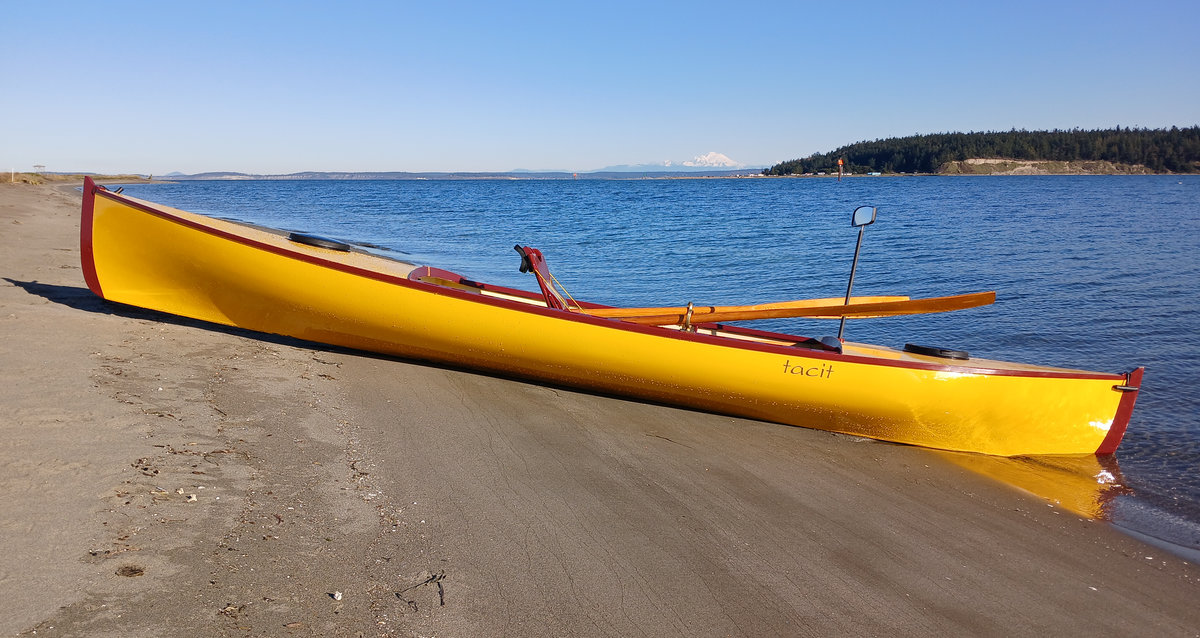
Tacit is the modified Adirondack Guideboat that I built for exploring and camp cruising the cold waters of the Pacific Northwest. It’s based on a 100 year old design that had been refined to perfection, which I then mucked with, adapting its shape and materials to fulfill a new set of requirements. It’s built using very lightweight Paulownia wood with fiberglass skins, has sealed decks with buoyancy chambers, a downwind sail, rowing mirror and other unique features.
It was a multi-year project, acquiring and drying wood, designing and building, and making new boat friends along the way.
Below you can learn the inspiration and requirements of this boat and see how I built it.
Where Did The Desire For This Rowboat Come From?
Nearly every day I walk from my house to a bluff with a view across the Strait of Juan De Fuca. To the north the San Juan Islands, to the east Whidbey Island with Mount Baker in the background, and five miles out to the west Protection Island and Discovery Bay.

During the calmer summer months I started getting a strong desire for a capable little rowboat that I could throw on a bicycle trailer, peddle my ass down to North Beach, and launch for some explorations along the shoreline of the strait. Once in good rowing shape, I could see circumnavigating Protection Island, a 20 mile row from North beach, and exploring Discovery Bay.


This is not a piece of water to take lightly though. It is big, with strong tidal currents; treacherous for even big boats in bad weather. I see folks in little boats and paddle boards out here, with seemingly little safety gear, but that is not me. To even consider it I wanted a rowboat capable of handling some waves, and with a turn of speed to overcome currents and wind, positive buoyancy for self recovery, with room enough for some safety gear and foul weather clothing. I also need to be able to carry it over some parking lot barriers to launch.
It also needs to be easily car-toppable, to access other local waters that don’t have trailer launch ramps for my other boats. Often it will hitch a ride on the cabin top of my Lavro Power Dory, with which I can quickly cross the strait heading north, or zip south to remoter areas of the Puget Sound. Once at a destination the dory become an anchored cabin, and the rowboat will be used for more intimate explorations.
It rowboat will also be used for multi-night camp cruising trips in the Salish and local lakes.
My Rowboat Requirements:
- A fast design proven to be capable of handling some coastal ocean conditions, waves and currents
- Significant volume of positive buoyancy chambers for self recovery
- Very lightweight, hopefully 65lbs or less, 16′ in length or less, and 40″ beam or less
- Fixed seat rowing
- It must be pretty
- Good load carrying capability for some camping trips
- Small downwind sail, but no foils
And I am pleased to say that I just about achieved everything on that list, except the weight. It ended up being 79 lbs. A bit heavy for portaging on my shoulders, but doable. I made some weight compromises for durability, appearance and ease of construction. But it is still remarkably lightweight for a 16′ rowboat with big decks and buoyancy chambers.
With the changes I was most worried about flattening the sheerline too much. But I am very pleased with how it looks. I tapered the outer gunnel height, reducing it as it reaches the ends, to convey a little more spring to the sheerline.
Choosing A Lightweight & Capable Rowboat Design
After a very thorough look at what was available, there was really only one design that almost fit my design brief, an Adirondack Guideboat. It had the speed, low weight, correct dimensions, and capability of handling some rough conditions. I figured I could use the basic hull shape functionality of a guideboat, and modify it to fit my other needs.
If you are unfamiliar, over a 100 years ago this boat was regularly being built to a weight of only 60 lbs, before any modern composites or glues. They are fully double ended, slender, low in the middle, with high ends, and tippy. Initial stability comes from sitting very low in the boat, like a kayak. They have very little wetted surface area for speed, but pick up lots of volume when people and gear are added. At first glance it might be mistaken for a canoe, but it is an entirely different creature.

They proved themselves as very capable boats that could be carried over long portages by guides. And in more recent years, they also commonly won the Blackburn Challenge Ocean rowing races, for fixed seat. There have been very rough years of that race where some guideboats made it, when many other designs did not complete. Here you can read an exciting story that Brooks Towns had in a production guideboat that he let me row, in the very waters I want my boat for. Another friend of mine has had a guideboat for a few years in the PNW. You can read about that here.
I was able to row a couple of guideboats locally. And I liked them!
Which Guideboat To Build?
Now that I had settled on a guideboat the question was which boat to build? There are a few plans and kits available, most are based on the B. & I. Parsons boat “GHOST”, but I did not find the lines of that boat pleasing.
Fortunately, through my process of research, I had made good friends with Rob Davidson and Allison Warner, two highly accomplished traditional guideboat builders on the east coast. Allison spent many years building reproductions of nearly every known design of guideboat for the Adirondack Museum, and Rob built a number of custom boats for clients. Together they offered a rare insight into this very rare form of boat building. And it turned out that Rob had a connection to Port Townsend, and planned to move here. Over a few years we have become good friends, and have had them to our home on visits.
Rob & Allison gave me the lofted lines for what they consider to be one of the most refined guideboats, a 100 year old, 16′ design by Caleb Chase, with a few of their own ideas added in. The boats they had built to these lines were drop dead gorgeous (pictured above), and are apparently not as “cranky” as many other guideboats. And my friends were cool with me using the lines in this experimental way.
Watch this video which happens to feature Rob and Allison and other guideboat builders to learn more.
Choosing A Building Method – Strip Planked In Paulownia Wood
Guideboats are traditionally built in a unique way, compared to other boats. They don’t use plans, or offsets. Instead each builder had their own full sized templates for the ribs, the bottom board and stems. Those are all cut out (the curved ribs from spruce roots), and joined together. Then the planks are attached over the ribs, each edge feathered together into a smooth round bottom, held together with a gazillion little nails. There are no building forms, other than a stand to hold it up for planking. In more recent years a few folks have created plans, and lofted lines. Most wooden shipwrights won’t touch one of these boats when repairs are needed. They require a specialized skill set.

I don’t have the skills to build a boat like that, nor the patience. And I desired a boat that was less a work of art, more durable, easier to clean out, and painted for active use and easy touch ups.
There are some production fiberglass/kevlar guideboats available. Why not start with one of those? Mostly because of weight. They start at over 70+ lbs. If I modified one with decks and hatches, it would likely be close to 100 lbs, and would be a foot shorter in length.

I decided to strip plank mine, which is now a fairly common way to build these boats, in Western Red Cedar.
But I had heard about a type of wood called Paulownia (or Empress Tree), that was about 30% lighter than Western Red Cedar, that some boat builders were using, particularly in Australia. It is not commonly used in the USA. It is one of the fastest growing trees in the world, so is very renewable, and a very good carbon sink. It can even regrow from a stump up to seven times.
Besides being very lightweight Paulownia glues well, without absorbing a bunch of like balsa does. It is very stable, and is not prone to rot. It’s even fire resistant. But it is definitely not as strong or as dense as cedar, and more prone to denting. So it is most suitable as a core material, with fiberglass on each side.
I happened to find a small mill in Aberdeen that had acquired a log of Paulownia, and bought up as many planks as they could get out of it. I stickered it and got it good and dry in my shop over a number of months.
It’s entertaining to hand someone one of these planks. When I let it go, their arms inevitably jerk up, expecting more weight, and they look at me in shock. The planks are crazy lightweight, and almost feel like foam boards.
Converting Guideboat Lines For Strip Planking
The lines plan had full sized lofted rib profiles, stem profiles, and bottom board offsets, and the respective bottom board rocker and sheerlines. Actually there were only rib profiles for 1/4 the total number of ribs, because it is a fully double ended design, and symmetrical on each side as well.
First I used tracing paper to transfer the rib lines to plywood, that was going to be cut into station forms. I created half as many stations as there were ribs, except in the ends, where there is a lot of shape and hollow to the planks.

Besides converting the plans to a strip plank building method, I also made the following changes to the design:
- No Ribs – The boat has no ribs, which are replaced by 4 oz S-glass inside and out.
- End Decks & Buoyancy Chambers Bulkheads – There are large decks for and aft, full bulkheads, and access hatches. They are fully water tight. There is 6′ of distance between the bulkheads, so I could technically lay down inside with the seat removed. I can’t imagine trying to sleep in this boat though.
- Less Freeboards In The Ends – Guideboats have very tall bows, necessary for an open boat designed to carry a heavy load in wavy conditions. But since I have sealed decks I decided to reduce windage and weight by lowering the ends, a good bit in the bow, more in the stern. I also slightly raised the center freeboard.
- Asymmetrical Sheerline – Fully double ended sheerlines have never really turned me on. So I moved the center of the sheerline curve slightly to the stern, about where the oarlocks sit.
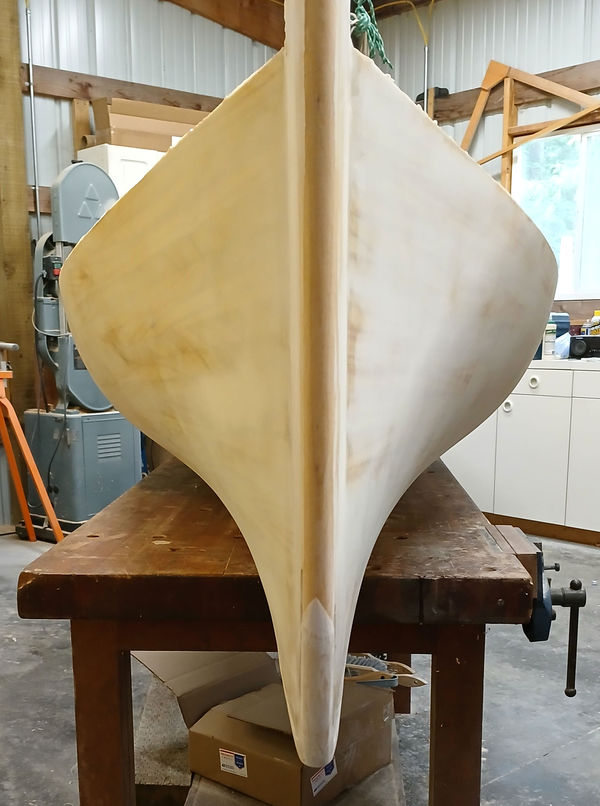
- PNW Stems – I also was not drawn to the reverse curve of guideboat stems. Mine curve outboard, and the stem head shape is also more to my liking. They are also in inner and outer pieces.
- Backrest With Built In Portage Shoulder Pads – I can flip my entire seat around, and there are shoulder pads on the back of the back rest that make it so that I can put the boat up on my shoulders for portaging.
- Rowing Mirror Mast – There are holes in the stern deck that support a carbon fiber tube with a rowing mirror on top.
- Downwind Sail – See more about this below.
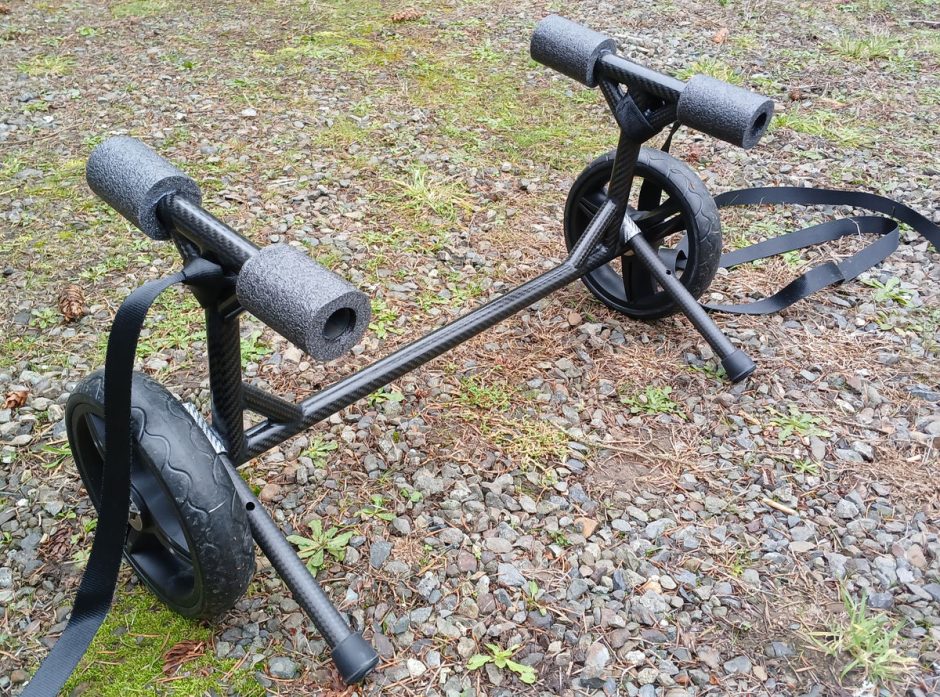
- Carbon Fiber Cart – The weight of the boat necessitates a moving cart. I did not like what I saw in those in the market. So I built one in some carbon fiber tubes I had laying around. The wheels can come off and it all fits into a hatch.
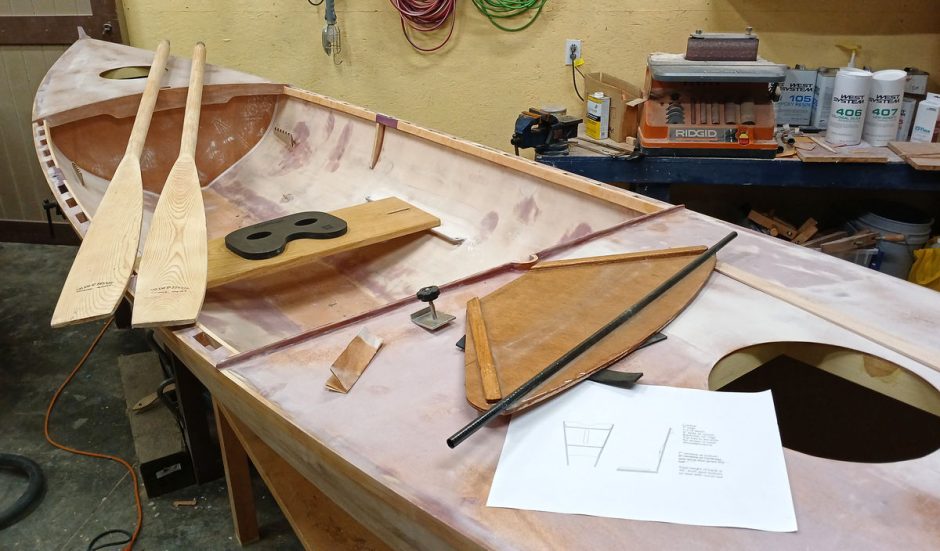
The Downwind Sail Design
I designed and built a downwind sail, stealing ideas from three others, a Dyson fan sail, a BSD Twins sail and a Cape Falcon Canoe Rig.
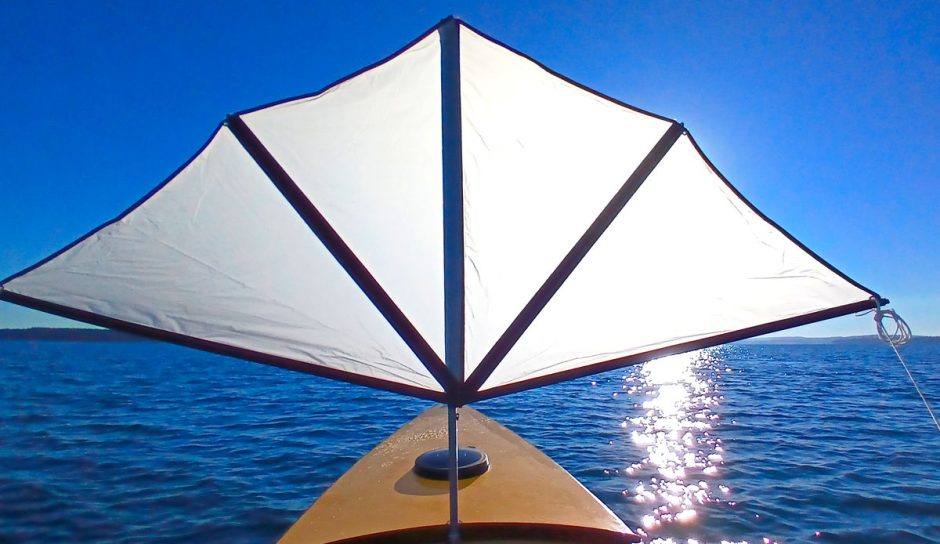
Since I first saw a picture of Dyson’s fan sail, probably 35 years ago, I have been enamored with its organic and beautiful appearance. Although the lack of forward visibility is unacceptable. The BSD Twins is a very good downwind sail for a small tippy boat. I stole the handle idea for controlling the two sheets, but ditched it after the first sail as being unnecessary. It’s easy to manage as a continuous line. From Cape Falcon I copied the very fast way the entire rig can be raised and dropped, without moving forward.


My sail works great. Goes up in a second, and down as quick. For a quick 50% reef, just flop one side over to the other. Let go of the sheets completely and the rig flies forward, dumping all wind.
It is built from 4oz tanbark dacron material on the perimeters, with some 1oz spinnaker fabric in the middle and carbon tubes for the mast and booms/battens. The entire rig, in its storage bag, mast included, weights just 1.8 oz.
So far I have not needed a rudder. I just steer with the two sheets, and weight shifts in the boat.
Building Pictures

I am not going to go into full details on how it was all built. It is much like any other strip planked small boat. Really the only thing unique is using Paulownia wood instead of Western Red Cedar, which I like a lot. It is very easy to glue, it was very flexible, taking the complex curves nicely, and not toxic like WRC.
Paulownia will dent easier than Western Red Cedar. But I fiberglassed the boat inside and out in 4 ounce S-glass, doubling up over the bottom board top and bottom, and then added another 4 oz tape on the bottom corners and a bit up the stems, that will receive the most abuse. S-glass, compared to the more common E-glass, offers much higher tensile strength, elastic modulus, and greater stiffness, which will help reduce dents. I also added a bit of hardwood at the ends of the bottom board, and along the outer stems, to prevent impact denting.
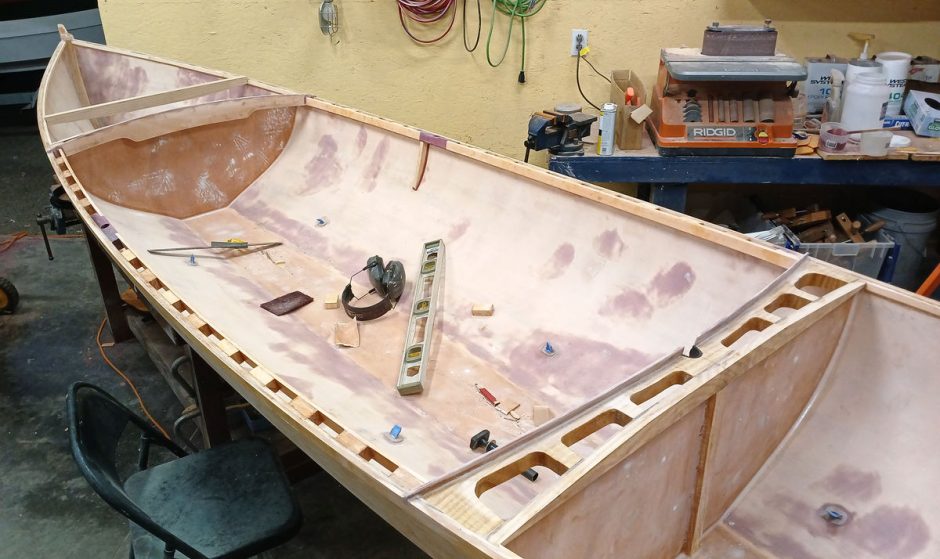
I built a strongback and attached the cut out forms. The bottom board was attached next (also in 3/4″ thick Paulownia), with a beveled wedge to receive the planking.
I used a two piece stem system. The inner stem allows the strips to easily lay along side, and to be cut off flush. Then the outer stem was epoxied to that surface, before glassing over.


The boat only weighted 37 pounds with exterior glass. All the inside stuff nearly doubled that weight, with hatches, hardware, and lots of paint weight. The supports for the coamings look beefy, but are in Paulownia and weighed very little. Paulownia was also used for framing the deck hatches and deck supports.
The gunnels were made of vertical grain spruce, leftovers from the building of Tally Ho’s spars. There is a tiny bit of purple heart integrated into the inner gunnel for the oarlocks. 3mm Okoume marine grade plywood was used for the bulkheads and decks.
Next I glued on the decks, added a few items inside to support the seat and foot brace, and then painted. I installed tie points to lash gear inside the decked areas and cockpit.
I hated my first foot brace design. The boat now has a very simple carbon fiber tube that goes across, with many adjustment points.
I already owned that pair of 8′ Shaw & Tenney spruce oars, so I cleaned them up with six coats of varnish, put on new leathers and gave them a try. I did not like them on this boat. They are not flexible enough, and not balanced enough with the big overlap required on this narrow boat.
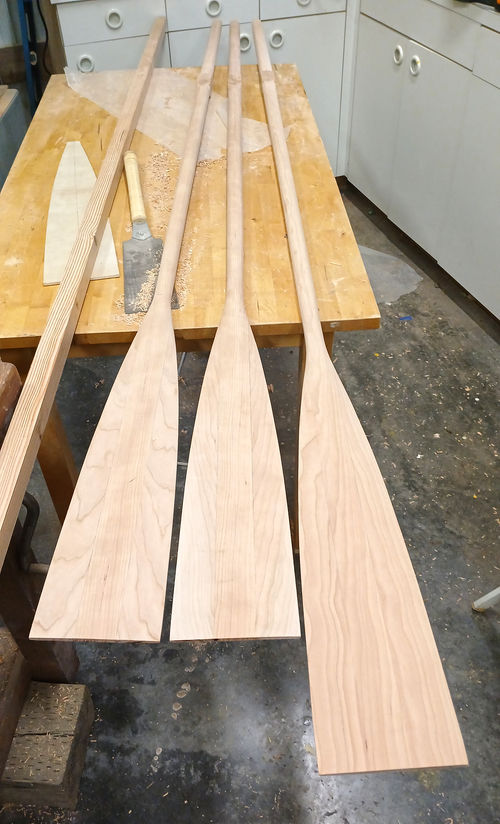
I am currently building a new oars that are much more like traditional guideboat oars, with pinned oarlocks. They are unlike oars from any other craft, with very slender dimensions, and lots of spring. Sometimes, the reason for the way things were done traditionally becomes crystal clear with direct experience of the boat.
Of course I am going to muck with them a bit, with a more slender upper loom to the handle, and lead inside for balance.
I also had to have some custom oarlocks made for these, because no one had any traditional pinned guideboat oarlocks in stock.
I am actually building two sets of oars, all from one big cherry plank. The working oars will be 8′ long, for less windy and downwind conditions, and a 7′ 6″ pair for upwind conditions. It will be comforting to have an extra pair of oars on longer adventures, in case one breaks.
Comments or questions? Click here.
Get on the mailing list to receive notice of new posts here.
Sharing?
Please do share this webpage URL anywhere you like. Do not copy any pictures or content though, unless you enjoy copyright lawsuits.